And the finished colour!!!!
Thursday, 6 March 2014
Wednesday, 5 March 2014
New progress
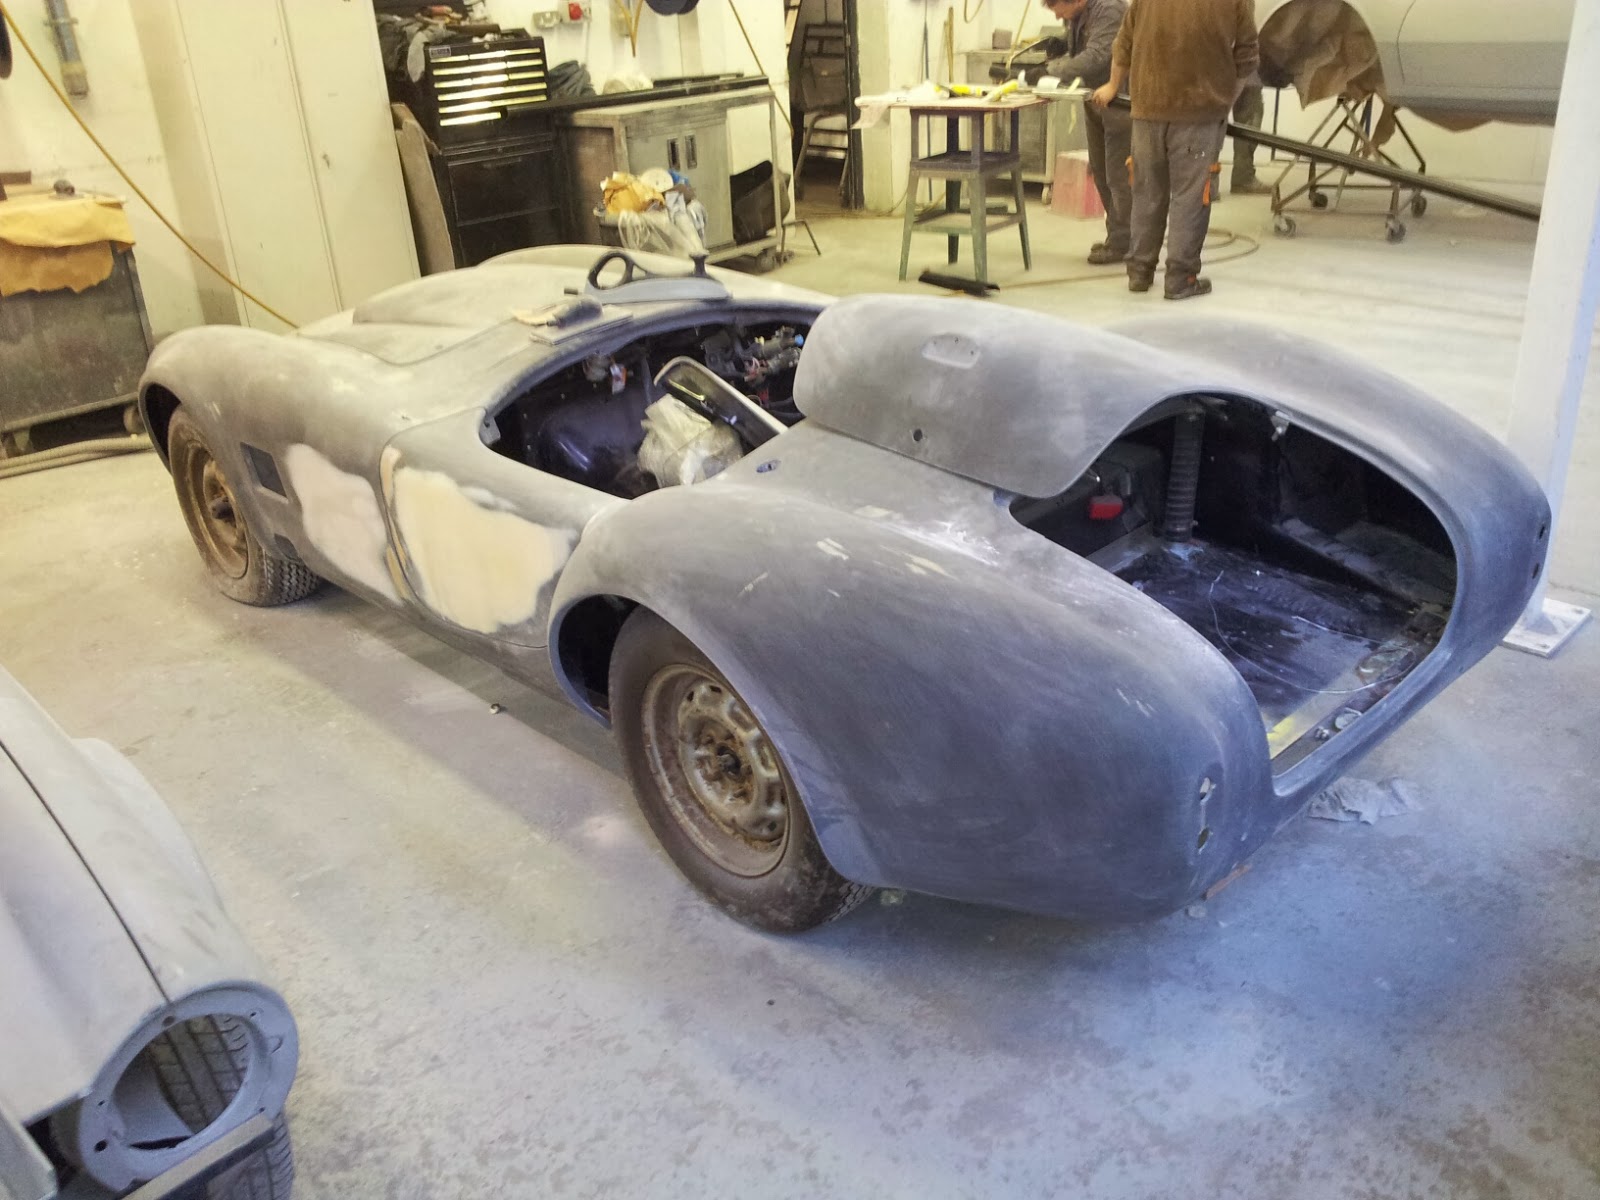
So After some deliberation I have decided to send Eleanore over to Dave Brooke's for final completion and IVA testing. After going through the options i wanted in terms of colour, Trim, wheels etc she was picked up in Feb and wound her merry way to Stoke on Trent.Dave then set to work preping her for paint. The below shots were taken at the paintshop prior to laying colour.
All being well she should be ready for the road by the end of March....
Monday, 5 August 2013
Tidying....
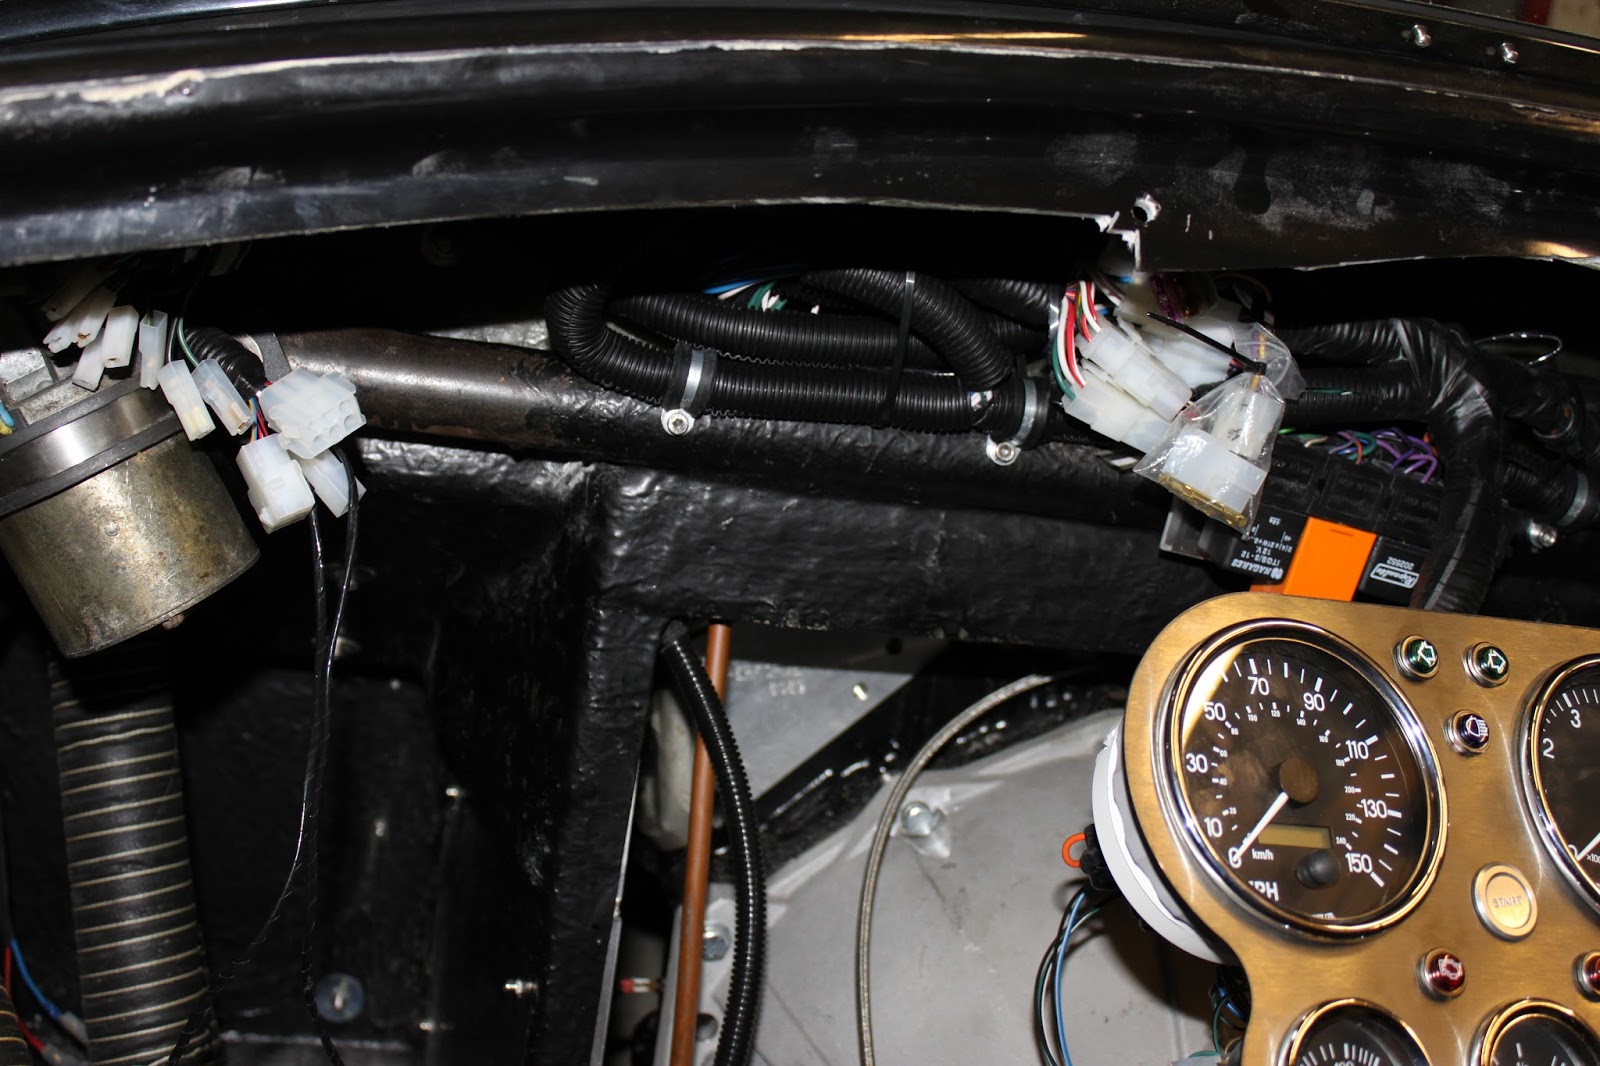
Starting to get the wiring tidied up now behind the dash. Using mainly convoluted split conduit and self amalgamating tape to seal it when the wires are in. Ive P-clipped the main loom into the scuttle hoop by drilling and then tapping some holes for M4 socket cap bolts.
Main loom connectors left free for future fault diagnosis or alteration. The connectors on the left are for the rear loom , heater and washer motor. These will run behind the wiper motor and then down the passenger door hinge plates. The rear loom then runs along under the passenger door, up the bulkhead and through to the boot compartment.
Battery tray has been Wurthed and then riveted down to the battery shelf floor. There are two captive nuts welded to the underside of the tray to allow the battery clamp to be bolted down so I drilled two holes into the battery shelf floor for these to locate into and then ran a bead or Wurth around them to seal the holes.
Shortened the main Earth cable and finally fabricated some aluminium plates to cover the holes where the roll bar and seat belt towers come through the body. These are again Wurthed to seal and hold them in place.
Fuel sender wiring is taped down using some 3M automotive tape. This will then be covered in sound deadening and finally the boot carpet.
Note Exhaust clamp around the fuel tank. Dax don't supply their tanks with an earthing tab (an IVA requirement is that the tank must be eart
hed) so I will run a cable from the clamp up to the right hand seatbelt tower to earth it to the chassis.
Still thinking about the best way to cover the wiring on the back of the rear lights. Also the number Plate light is now wired in at the light end and I need to connect this to the rear loom. I need to come up with some form of protection for the wiring from the boot lid to the under side of the body....hmm....
Main loom connectors left free for future fault diagnosis or alteration. The connectors on the left are for the rear loom , heater and washer motor. These will run behind the wiper motor and then down the passenger door hinge plates. The rear loom then runs along under the passenger door, up the bulkhead and through to the boot compartment.
Battery tray has been Wurthed and then riveted down to the battery shelf floor. There are two captive nuts welded to the underside of the tray to allow the battery clamp to be bolted down so I drilled two holes into the battery shelf floor for these to locate into and then ran a bead or Wurth around them to seal the holes.
Shortened the main Earth cable and finally fabricated some aluminium plates to cover the holes where the roll bar and seat belt towers come through the body. These are again Wurthed to seal and hold them in place.
Fuel sender wiring is taped down using some 3M automotive tape. This will then be covered in sound deadening and finally the boot carpet.
Note Exhaust clamp around the fuel tank. Dax don't supply their tanks with an earthing tab (an IVA requirement is that the tank must be eart
hed) so I will run a cable from the clamp up to the right hand seatbelt tower to earth it to the chassis.
Still thinking about the best way to cover the wiring on the back of the rear lights. Also the number Plate light is now wired in at the light end and I need to connect this to the rear loom. I need to come up with some form of protection for the wiring from the boot lid to the under side of the body....hmm....
Thursday, 25 July 2013
Clutch and Brakes are now bled. Normally straight forward but except for a leak in the from master cylinder fitting - bugger! Managed to borrow a decent flaring tool (don't be tempted by Ebay crap!) from a mate at the local garage and re flared the pipe on the car. All sorted.
Final fuel connections are complete. I needed to get a 1/2 inch (Tank outlet) to 3/8 inch reducer (Fuel Hose) which I ordered from Dax. Another marvel - bit of cheap plastic that they charged me 8 quid for and is available elsewhere for 50p. Live and learn I suppose.
Took the car up the (private!) road for its first drive and everything seems to be good. Momentous day!
Most of the big stuff is now done but there is a lot of work left in this car yet.....
Final fuel connections are complete. I needed to get a 1/2 inch (Tank outlet) to 3/8 inch reducer (Fuel Hose) which I ordered from Dax. Another marvel - bit of cheap plastic that they charged me 8 quid for and is available elsewhere for 50p. Live and learn I suppose.
Took the car up the (private!) road for its first drive and everything seems to be good. Momentous day!
Most of the big stuff is now done but there is a lot of work left in this car yet.....
She Lives!
After fitting the second side pipe and a bit of double checking of everything prior to actually turning the key I plucked up the courage and went for it.
Using a jerry can at the mo as I need a reducer for the actual tank. Key in, turn to second position and the fuel pump primed........Breathed in and turned the key. Turned over twice and fired up! Runs absolutely beautifully with no need to change any carb settings. Mike Huddart is a miserable git, but when it comes to engines this boy knows his stuff.
After warming up for a few minutes I set the rad fan to come on at 80 Degrees. The noise these exhausts make is truly epic and is exactly the rumble I was looking for. You can almost hear each piston moving at idle.
I haven't managed to get a decent video of the engine noise yet as I cant get the sound to work properly but Ill get something up soon for prosperity.
Using a jerry can at the mo as I need a reducer for the actual tank. Key in, turn to second position and the fuel pump primed........Breathed in and turned the key. Turned over twice and fired up! Runs absolutely beautifully with no need to change any carb settings. Mike Huddart is a miserable git, but when it comes to engines this boy knows his stuff.
After warming up for a few minutes I set the rad fan to come on at 80 Degrees. The noise these exhausts make is truly epic and is exactly the rumble I was looking for. You can almost hear each piston moving at idle.
I haven't managed to get a decent video of the engine noise yet as I cant get the sound to work properly but Ill get something up soon for prosperity.
After finally working out the connections for the dash from the cockpit harness and then finishing all the engine bay stuff and rear lights I connected the battery for the first time.
Big moment and although there were no bangs fizzing or smoke there was an immediate problem. Even with the key out there was power being fed into the dash instruments. Bugger! A phone call to Dave Brookes and we went through all the column switch connections and there wasn't an issue here. Scratching my head I phones Martin from ECS (Dax loom supplier) and we managed to at least narrow the problem down to a single circuit. After methodical checking of the instrument wiring I found the issue which turned out be the fuel gauge wiring. Somehow id managed to get the live and feed wires the wrong way round and the live was then back feeding the instruments. Switched them and all was well. Thank goodness for that!
Everything works (that is wired in). Switched the heater on and got covered in fibreglass dust! Also discovered the parking ramp for the wiper motor needs reversing.....
Turned over the engine and again all good. Getting closer to first start!
Big moment and although there were no bangs fizzing or smoke there was an immediate problem. Even with the key out there was power being fed into the dash instruments. Bugger! A phone call to Dave Brookes and we went through all the column switch connections and there wasn't an issue here. Scratching my head I phones Martin from ECS (Dax loom supplier) and we managed to at least narrow the problem down to a single circuit. After methodical checking of the instrument wiring I found the issue which turned out be the fuel gauge wiring. Somehow id managed to get the live and feed wires the wrong way round and the live was then back feeding the instruments. Switched them and all was well. Thank goodness for that!
Everything works (that is wired in). Switched the heater on and got covered in fibreglass dust! Also discovered the parking ramp for the wiper motor needs reversing.....
Turned over the engine and again all good. Getting closer to first start!
Sunday, 14 July 2013
Updates!
Been a while since I updated the blog...... Not that there has been a lack of progress on the car however.
Coolant system all plumbed in. I modified the lower stainless pipe from Dax by shortening it by about 3 inches. This then allowed the pipe to run over the cross-member instead of below it as per the manual. Given the lack of ground clearance i didn't want it dangling below the chassis. Fortuitously this was made easier as Dax had given me the wrong part - again by supplying a DeDion pipe instead of an IRS.
For any who are scratching their head about this as I was, the pipe run goes:
Upper - Thermo housing into about 6 inch rubber straight pipe into straight stainless (Dax Supplied) which i shortened by about 8 inches. Then runs into 45 Degree bend, straight joiner and into a straight reducer onto the rad (38 to 35mm).
Lower - 90 Degree elbow from water pump outlet into shortened Dax stainless lower pipe and finally into 90 degree reducer to rad.
Fan thermostat also wired in.
I picked up my Exhausts and Headers from Dave Brooks in April and have one side fitted(the more difficult drivers die due to the brake servo restricting access). Loom is now in including middle and rear sections but I still need to fix it down properly. All connections with the exception of the column stalks are done from the engine bay through to the boot including the instruments.
Servo heat shield and shielding for the brake line that runs under the drivers side header completed.
Heater fitted (this was a total pita!). Still have run the ducting although it is attached to the heater itself.
Ballast resistor, ignition coil and distributor are all in and wired up.
Front and rear lights are now all wired in.
Instruments fitted to dash in-lay and wired.
Still a long list of jobs to do but progress is progress!
Coolant system all plumbed in. I modified the lower stainless pipe from Dax by shortening it by about 3 inches. This then allowed the pipe to run over the cross-member instead of below it as per the manual. Given the lack of ground clearance i didn't want it dangling below the chassis. Fortuitously this was made easier as Dax had given me the wrong part - again by supplying a DeDion pipe instead of an IRS.
For any who are scratching their head about this as I was, the pipe run goes:
Upper - Thermo housing into about 6 inch rubber straight pipe into straight stainless (Dax Supplied) which i shortened by about 8 inches. Then runs into 45 Degree bend, straight joiner and into a straight reducer onto the rad (38 to 35mm).
Lower - 90 Degree elbow from water pump outlet into shortened Dax stainless lower pipe and finally into 90 degree reducer to rad.
Fan thermostat also wired in.
I picked up my Exhausts and Headers from Dave Brooks in April and have one side fitted(the more difficult drivers die due to the brake servo restricting access). Loom is now in including middle and rear sections but I still need to fix it down properly. All connections with the exception of the column stalks are done from the engine bay through to the boot including the instruments.
Servo heat shield and shielding for the brake line that runs under the drivers side header completed.
Heater fitted (this was a total pita!). Still have run the ducting although it is attached to the heater itself.
Ballast resistor, ignition coil and distributor are all in and wired up.
Front and rear lights are now all wired in.
Instruments fitted to dash in-lay and wired.
Still a long list of jobs to do but progress is progress!
Subscribe to:
Posts (Atom)